Quick Installation Guide: OvenGUARD© R2.0
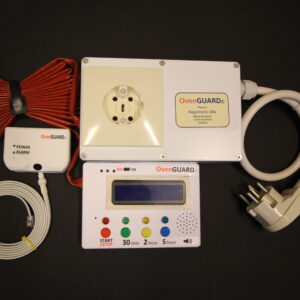
The OvenGUARD© system is delivered with 3 units:
The PSU unit The Control unit The FIR unit (temperature sensor).
The PSU and the control unit are connected by cable. The FIR unit is wireless and separate.

Picture 1: OvenGUARD© system
Important: OvenGUARD© is for electric stoves/ovens with 400VAC 3-phase voltage and 16 Ampere current only.
Installing OvenGUARD© does not require an electrician. It is a “Plug and Play” system.
The PSU connects to the 400VAC wall mains with a 5-pin Perilex plug. The PSU has a Perilex socket, and the stove/oven’s Perilex 5-pin plug is plugged into it.
The plug that connects the stove/oven must be a Perilex 5-pin connector with this wiring:
L1: brown
L2: black
L3: white/grey
N: blue
GND: white/green

1: Installation of OvenGUARD© R2.0
1. Turn OFF the power to the electric stove/oven and pull the stove/oven away from the wall. Unplug the stove/oven from the wall mains socket.
2. Place the OvenGUARD© PSU unit on the floor near the wall socket, on its narrow side (see picture below).

Picture 3: OvenGUARD© PSU unit placement
3. Plug the PSU’s Perilex plug into the wall’s 400VAC mains socket, and plug the stove/oven’s plug into the OvenGUARD© PSU.
4. Mount the FIR unit about 45 cm above the stove’s surface. The FIR unit has double-sided tape on its back cover. There is a slide switch on the left side of the FIR unit. Push this switch to “ON”.
5. Place the control unit on the kitchen counter and move the stove/oven back to its usual position. The installation is now complete (see picture below).

Picture 4: OvenGUARD© R2.0 system installed
2: Using the OvenGUARD© system

Picture 5: Controller unit
1. Slide the ON/OFF switch on the controller to “ON”. The display lights up and shows instructions.
2. Choose a time by pressing one of the colored buttons (e.g. green = 30 min).
3. The chosen time’s LED lights up and the time is shown on the display.
4. Press START/STOP to activate the timer.
5. A buzzer sounds and the countdown begins.
6. The 3 LEDs to the left of the ON/OFF switch light up. The stove/oven is now ready for normal use.
7. The FIR unit is wireless and must be activated by pressing the “START” button on the FIR unit every time you use a timer. A green LED lights up on the FIR unit to show it is active.
8. On the controller, a green LED marked “FIR” lights up when the FIR unit is connected to the controller.
9. The green LED on the FIR unit blinks the whole time the timer is running. The FIR unit switches OFF automatically when the timer ends.
10. When 5 minutes remain on the timer, the buzzer sounds. It sounds again when the timer ends.

Picture 6: OvenGUARD© FIR unit

Picture 7: Side view of FIR unit (ON/OFF slide switch)
11. When the chosen time ends, the current to the stove/oven is disconnected.
12. While the timer is running, you can interrupt it by pressing START/STOP and choosing a different time.
13. If a fire breaks out on the cooking surface, the FIR unit activates the buzzer, the red alarm LED lights up, and the current to the stove/oven is shut off immediately.
Note: This overheating system only shuts down the stove/oven. Your household still needs a smoke detector alarm to detect fires.
14. Changing the FIR unit batteries: The FIR unit is battery operated and lasts about 9 months to 1 year. It uses 3 x AAA batteries. When the BAT LED lights up, the batteries need replacing. Push the switch to “OFF”, remove the unit from the wall by pulling off the top part, and replace the 3 old batteries with 3 new ones. Do not forget to push the switch back to “ON” afterwards.

Picture 8: OvenGUARD© FIR unit with battery pack
Related
Only logged in customers who have purchased this product may leave a review.

 Cart is empty

Reviews
There are no reviews yet.